
Create Questions in a FLOWmulti
FLOWmulti is used to build interactive exams with the possibility of including several different types of questions, for example multiple-choice and essay questions - in total there are 48 available question types. You have also the opportunity to include types of media in your exam, such as audio and video.
- Key concepts in WISEflow
- To create a section/question
- Question types
- Share created questions/sections with colleagues
Key concepts in WISEflow
- Flow – this is the administrative framework, encompassing the entire process of administering an examination from beginning to end.
- Assignment – a single exam in editable mode.
- Published assignment – a published exam ready for use and locked for editing.
- Content bank - a library of exam questions.
- Section – a digital page from an exam, often containing a question.
To create a section/question
- Go to the author tab at the top of the page.
- Click on the content bank icon, visible to the right of assignments

- Click on + new section

You can now create an exam section in which you can include a question and/or several sub-questions, depending on how you want to build your exam. - Find the type of question you want and click on it to create it.
- An author can choose to include ‘assessment guidance’ when creating the question (by clicking ‘more options’ and scrolling down), this guidance can include text and imagery. If you add content here it will replace the original question text. Including when students receive their exams back, and should therefore be in the form of ‘suggested answers’.
If the author chooses not to use ‘assessment guidance’ to provide student feedback, then students must be offered the opportunity for feedback in another way. For example, assessors can add supplementary assessment guidance during assessment by creating a comment in the Flow that is visible to all. You are also able to attach a PDF file to your comment.
Text entered into the ‘comments for authors’ field (to the right of ‘assessment guidance’) will be visible only to authors and assessors. This is where an author can enter assessment instructions for use during assessment. Text entered here is not visible to students when they receive their exam after assessment.
These two fields are found in all question types, but are most often used for essay questions.
- Click ‘create question’ in the top right of the window to save the question and create the section.
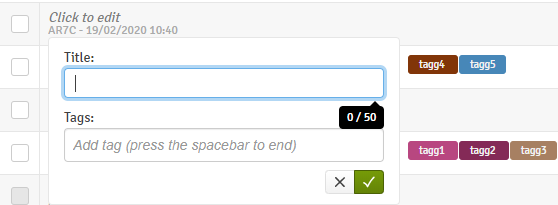
- Now you can create a title and any tags for your question/section. You do this by:
- Click on the box with the text "click to edit".

- In the box that opens, enter the title in the top field and any tags in the bottom field.
- When adding a tag, type in the tag word then press space to create it, you can then add successive tags in the same way.
- If you want a tag to consist of two words or mor then use and underscore instead of space in the tag, for example "Term_2".
- When you've entered the title and any tags, click on the green tick box to save them.
- Click on the box with the text "click to edit".
- To create the next question in a new section, repeat the above. However, if you want to add more questions to the same section (page), then click the small arrow to the right of the section header to expand the view and select ‘add content to the section’.


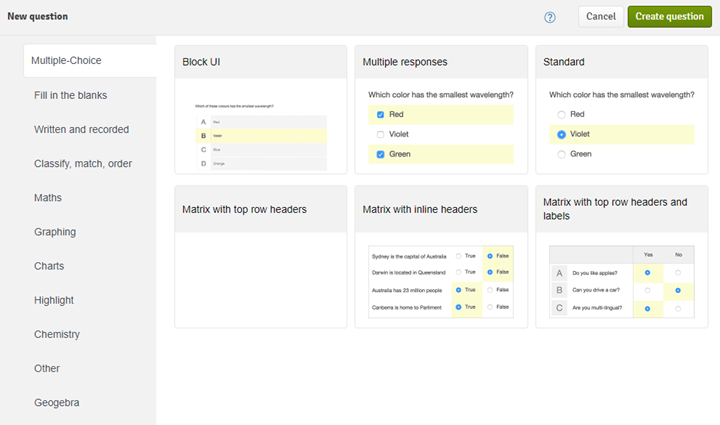
Question types
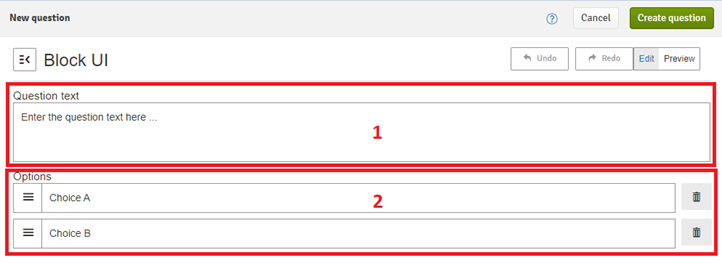
To create a multiple -choice question (MCQ):
- Choose one of the question-type options in the category ‘multiple-choice’.
- Enter the question in the ‘question text’ box (box 1 in the image below).
- Enter the answer options you want under ‘options’ (box 2).
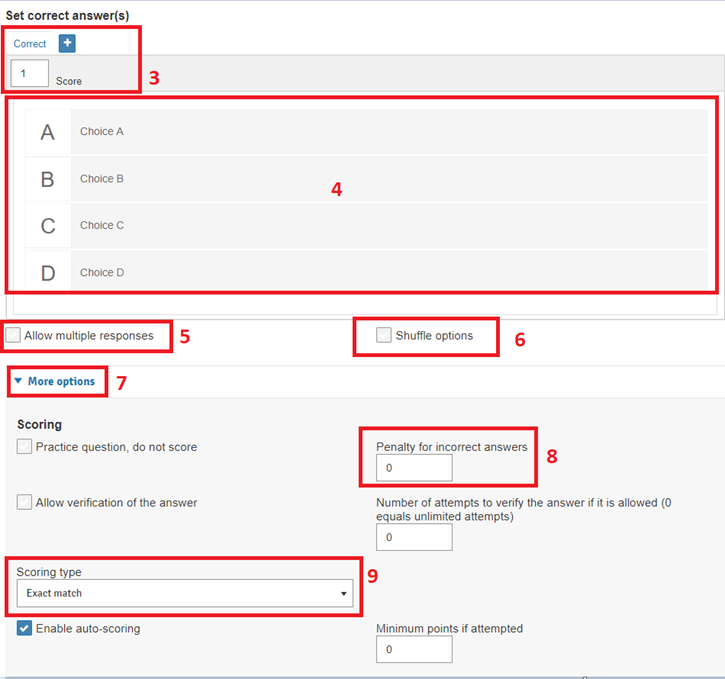
- Enter points for a correct answer (box 3).
- Set the correct answer (box 4).
- If multiple answers are to be allowed, correct, select the ‘allow multiple responses’ box (box 5).
- Select the box for ‘Shuffle options’ if you want students to be shown the options in different orders – i.e. reducing the risk of them copying each other (box 6)
- To set penalties for incorrect answers, click on ‘more options’ (box 7) then set the penalty for incorrect answers (box 8).
NOTE! If you want the system to assign penalty points if the student selects more than just the correct answer, the author of the assignment must set up the question so that it cannot give negative points – this is done at the ‘assignment’ level, not per section. - Select scoring type (Box 9). ‘Partial match per response’ means that the points available are split based on the number of correct alternatives. Each correct selection contributes to the score assigned.


To create an essay question:
- When selecting the question-type, go into the category ‘written and recorded’ and select ‘essay’.
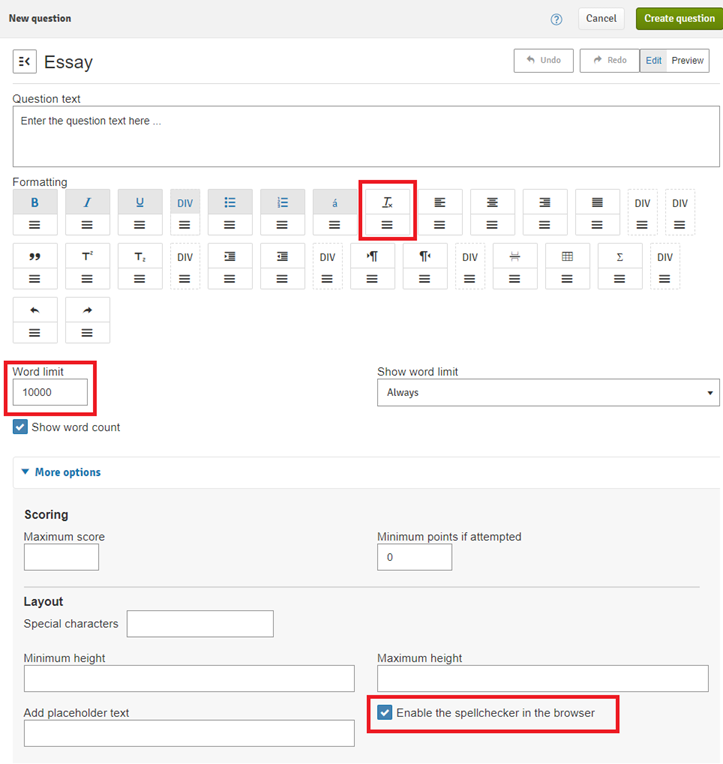
- Enter your question in the ‘question text’ box. If you are pasting in text from Word, any formatting will be included – you can remove formatting by using the highlighted icon in the image below.
- Enter the maximum word length of the essay in the ‘word limit’ field (see image below).
- Always uncheck ‘Enable the spellchecker in the browser’.

Share created questions/sections with colleagues
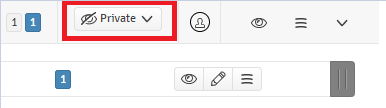
- If you want to share your sections/questions with a colleague – for example they may be creating an exam or you may be collaborating to build-up a question bank – then, in your content bank page to the right of your section heading, click on the little arrow next to the text ‘private’.
- You now have the option to ‘share with everyone’ or ‘search for author’. If you choose ‘share with everyone’ then your question will be shared with the entire university (this is not used often), whereas if you ‘search for author’ you are able to search for a specific author (a colleague or shared theme-based account) in the system.
- Enter the name of your colleague(s) in the search field.
- Tick the small white box to the right of the colleague(s) name(s) if you want to share your question/section with them. Now click on the green ‘Share with selected’ button.
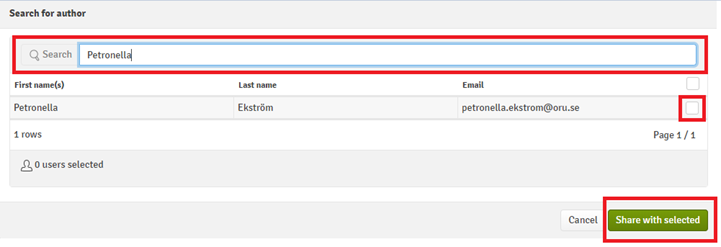
Your colleague(s) will now be able to find your section/question within their own content bank.


When you're done creating your questions it's time to add the questions to an assignment
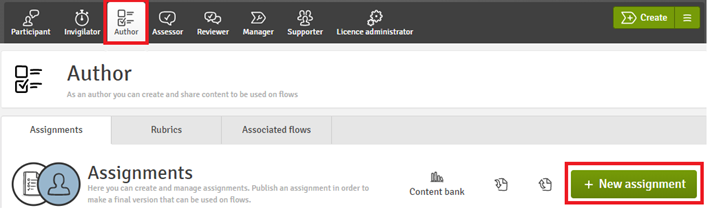
- Click on the Author tab
- Select New assignment
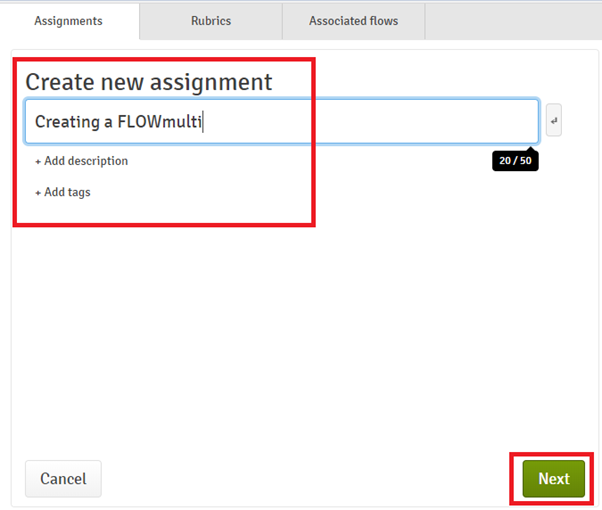
- Enter a title for your assignment (Make sure the assignment matches its name in the course syllabus.)
- You can choose to add a description of the assignment.
- You can choose to add tags to your assignment.
- Click ‘next’ to create your assignment.
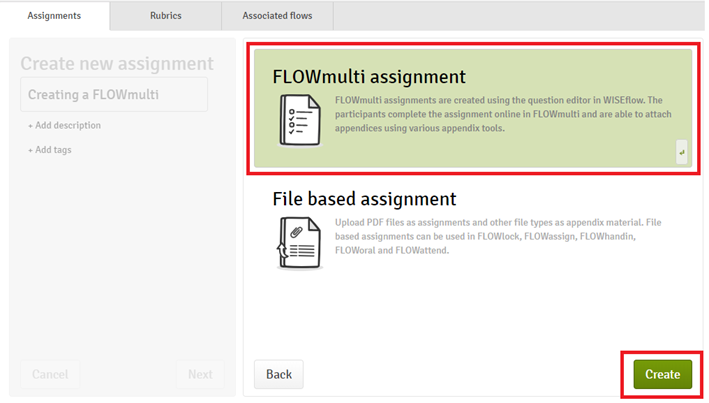
- Select ‘FLOWmulti assignment’ and then the ‘create’ green button.
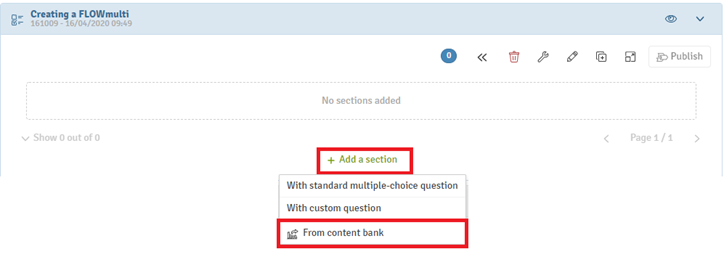
Once you've created your assignment, it's time to add content - Click Create Section - From content bank
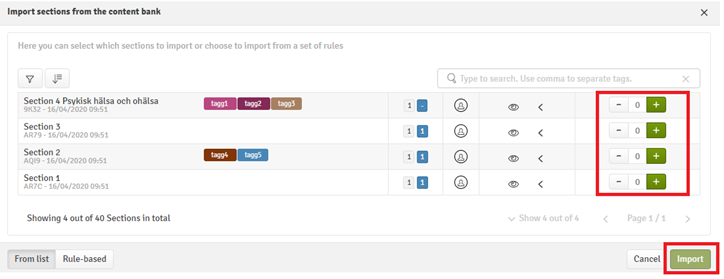
- Select the sections/questions you want to add to the assignment by clicking the + button the the right of each section. When you're done, select import.
- The sections are now added to your assignment
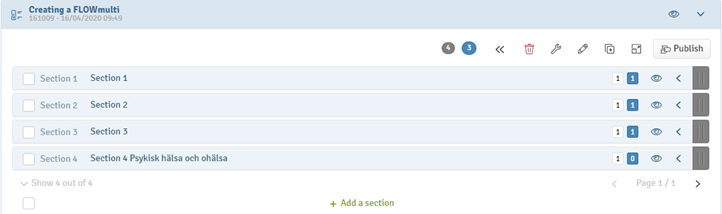
- You can rearrange the sections by using drag and drop on the gray boxed to the right of each section.
- Edit a question by clicking the section heading and then the pen-icon to the right of the question.


Publishing the assignment
When you have finished creating your assignment, you must click Publish before you or anybody else can add the assignment to a flow.
Select Publish, preview the assignment and confirm.

Your assignment will now be visible in Published assignments, which you can find at the bottom of the Assignments tab. From here you can copy the reference code by clicking the name of the published assignment and then add it to a flow.