
Sole Assessor on a FLOWmulti
The reason for choosing this assessment distribution is to allow you to assess an exam with or without points, yourself reviewing and deciding what a students' final exam assessment will be.
What information should the education administrator have?
- That you are the sole assessor and should be assigned all participants, i.e. allowing you to grade all participants.
Perform assessment
You can see all exam sections and questions, and review them all.
- Click the ‘assessor’ tab. Then click on the green arrow in the relevant flow.
- Click the green ‘open the assessor tool’ button.

- At the top of the exam head you will find two tabs. The left one (the name of the exam) contains all students' exams in a list whilst the right tab (below "Flow ID number 1") is the individual student's exam you are currently in.
- The left tab is used to navigate between student exams, by clicking the FLOW:ID number.
- The right tab is used set a grade manually and register all grades when the assessment if completed.

- For automatically-marked questions, you just need to check that the system has done this correctly.
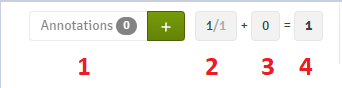
- Here is how you read the boxes for points:
- Box 1: Annotations: By clicking on the green ‘+’ you can create an annotation for a specific section.
- Box 2: Automatic points: Here you see how many automatically-determined points the student has received (for automatically-marked questions) and how many points the question can give. If you do not think the system has scored the question as you intended, you can enter or subtract points manually. Use box 1 – click on the green ‘+’ to open the annotation pane allowing you to set scores. The score you give must not exceed the maximum score allowed for the question.
- Box 3: Manually allocated points: Here you can see how many points you have manually allocated to a question.
- Box 4: Total points: In this box you can see the sum of all points allocated – both automatically and manually.
- By clicking the + green button you can add comments and points for that section
Your comments and points are saved automatically so when you're done you can close the annotation box.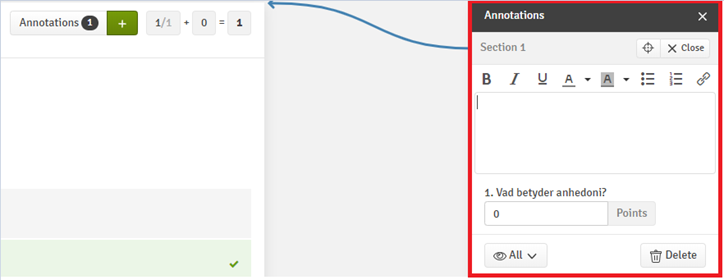


Summarise a students' results
The manual assessment of an exam can be done in two different ways.
Version 1:
Let the system calculate the grade based on scoring boundaries, then go in and manually change grades if they do not meet any "additional requirements". For example, "The student must achieve a minimum of 65% of points available in the exam, and at least 3 points per part."
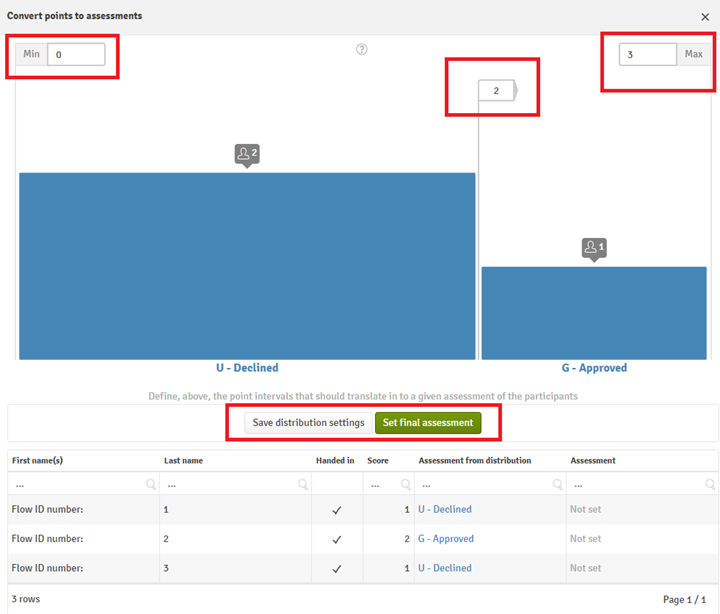
By clicking on the top left tab within the assessment tool you will find the following image. To set the parameters for points-based assessment, click on ‘convert points to assessments’.
To set up the parameters in the view that opens, make sure that:
- The minimum value is 0 and the maximum value corresponds to the maximum value of the exam.
- To enter values for grade boundaries, click in the box, enter the value, then press enter to set it.
- Save your preferences by clicking ‘save distribution settings’.
- Click the ‘set final assessment’ (green button). The system now enters suggested grades based on the parameters for grade boundaries.
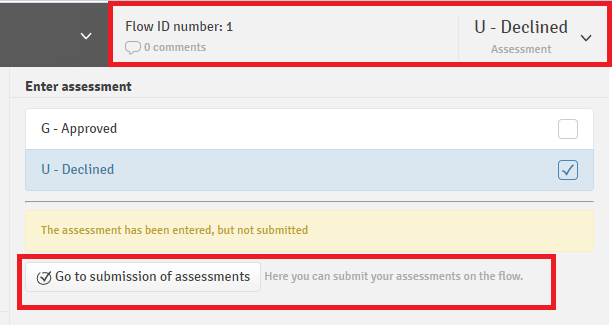
- By clicking on the top right tab within the assessment tool, you can then select ‘Go to submission of assessments’. In this view you will see a list of all suggested grades. To change a grade, click on the box containing the grade, and select an alternative grade from the list that opens.


Version 2:
Manage the assessment entirely manually. For example, "The student must achieve at least 65% of the points for each part of the exam."
- Click on the top right tab in the exam's header, i.e. where the FlowID is displayed.
- Set a grade for each student by selecting the achieved grade.
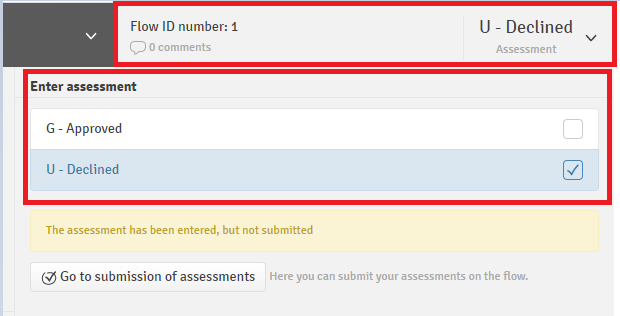
- Register all grades by clicking on the top right tab within the assessment tool, you can then select ‘Go to submission of assessments’.

If different parts of the exam are assessed separately and you want to explain the results for the student, you can write a general comment to the student. Here's how:
- Click on the top right tab in the exam's header, i.e. where the FlowID is displayed.
- Click ‘add comment’.
- Add your comment in the text box that opens, for example ‘In part 1 you have 24 points out of 38 points, which is 63%. You are graded G on this part’. The text is saved automatically when you close the box.

